In the intricate world of embroidery design, choosing the correct vector file format is pivotal to icing perfection, scalability, and quality in your final sutured product. The embroidery process is deeply dependent on the file format for embroidery, as not all file types work seamlessly with embroidery machines. This composition provides a comprehensive companion to understanding the differences between vector file formats and how to elect the most suitable embroidery file type for your design.
Understanding Vector file formats in Embroidery
Before diving into embroidery-specific formats, it’s essential to grasp the basics of vector file formats. Unlike raster images composed of pixels, vector images are composed of paths defined by fine formulas. This makes them ideal for embroidery digitizing, as they offer
Scalability without loss of resolution
Clean lines and sharp details, pivotal for suturing
Simplified editing for resizing, recoloring, or displacing rudiments
Popular vector file formats include
AI (Adobe Illustrator)
EPS (reprised PostScript)
SVG (Scalable Vector Graphics)
PDF (Vector- grounded PDF)
While these formats are excellent for designing, they must be converted into embroidery lines format that an embroidery machine can understand.
Difference between Vector Files and Embroidery Files Format
Vector lines are only the starting point in embroidery. The real magic happens during embroidery digitizing, where a vector design is converted into sew data. This is saved in a specific embroidery file format, unique to each embroidery machine brand.
Then’s how they differ
Vector file Format Purpose Embroidery file Format Purpose
AI,. SVG,. EPS Design phase. DST,. PES,. EXP Machine- read stitching commands
thus, while you might design a totem in. SVG, your embroidery machine will need a file type for embroidery machine like. DST to execute the design.
Utmost Common Embroidery file Types and Their Uses
Different embroidery machines support different embroidery file types. Understanding which one to use is essential to avoid crimes and achieve optimal results. Below is a breakdown of the most common types
DST( Tajima)
Most extensively used format in the assiduity
Contains sew commands, not image data
Compatible with utmost marketable machines
PES (Family/ Baby lock)
Generally used with home and semi-professional machines
Stores color data and sew types
Habituated heavily by embroidery potteries
EXP (Malcom/ Bernina)
Feather light file, used for fast processing
Does not contain expansive color information?
JEF (Janome)
Designed for Janome machines
Includes sew, thread, and circle data
VP3/. Personality (Husqvarna/ Pfaff)
Advanced formats storing thread, layers, and design positioning
Choosing the right file type for embroidery machine ensures flawless prosecution and avoids comity issues.
How to Choose the Right file Format for Embroidery
When opting the right file format for embroidery, consider the following
1. Know Your Embroidery Machine
Check your machine’s primer or software to find compatible embroidery file types. Each brand supports specific formats, and using the wrong bone can affect in crimes or design failure.
2. Start with a Vector Format
Produce your design in a vector file format similar as. SVG or. AI. These give inflexibility and high- quality detail during the digitizing process.
3. Use Professional Digitizing Software
Convert your vector design into an embroidery file format using software like
Welkom
Hatch
Brother PE- Design
Embed
These tools allow you to manually acclimate sew types, direction, viscosity, and sequencing to insure the design translates impeccably onto fabric.
4. Save and Test the file Type
After conversion, save the file in the needed embroidery file type(. DST,. PES, etc.). Run a test on a sample fabric to insure sew delicacy and integrity.
Stylish Practices When Working with Embroidery file Formats
To avoid gratuitous complications, follow these stylish practices
Always back over original vector lines before digitizing
Use high- discrepancy colors in your vector designs for easy visualization
Keep designs simple and clean – avoid inordinate small details that wo n’t restate well
Test sew viscosity – too thick can damage fabric, too loose can appear untreated
Marker file names easily with interpretation figures and machine comity
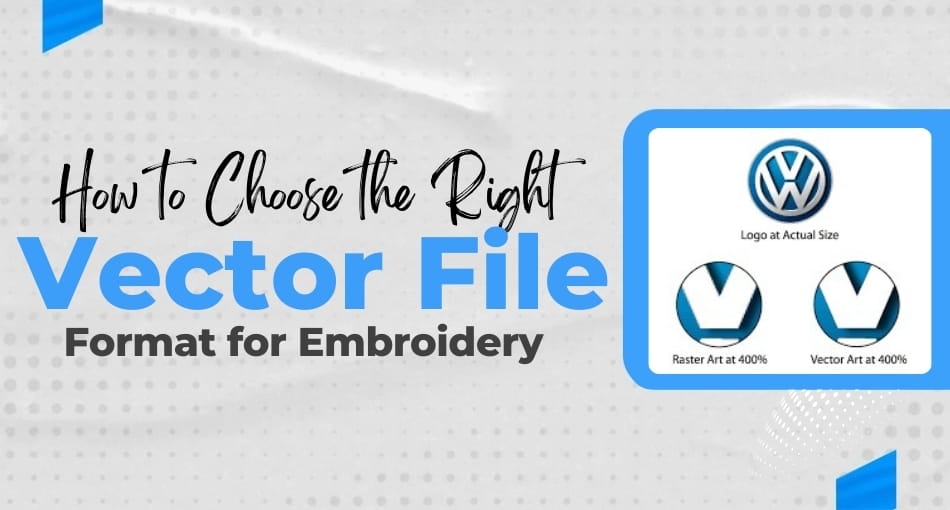
Why Vector Files Are Essential in Embroidery Digitizing
Without a clean and accurate vector file, embroidery digitizing becomes complicated and error-prone. The quality of your vector artwork directly affects the final sutured affair. Clean lines, optimized paths, and well- organized layers insure smoother conversion to a usable embroidery file format.
Choosing the Right Software for Embroidery file Conversion
The software you use is just as important as the file format. Look for software that supports
Direct vector file import
A wide range of embroidery file types
Manual sew editing
Fabric simulation and sew trials
Exemplifications include
Welkom Hatch – Best for professionals
Sew Art – Good for newcomers
Embed Studio – Versatile and point-rich
TruEmbroidery – acclimatized for Mac druggies
Final studies
Choosing the right vector file format and converting it into the embroidery file format is pivotal for high- quality machine embroidery. Understanding the difference between design lines and embroidery file types helps you avoid specialized issues and achieve a polished, professional result.
Whether you’re creating custom-made patches, ensigns, or badges, starting with the right file type for embroidery machine and duly digitizing it ensures your design comes to life exactly as envisaged.